|
 |
|
|
|
|
|
|
Whirlpool Washer Repair
Appliance repair
>
Washers
>
Whirlpool Washer >
Replacing water inlet hoses
READ THIS FIRST!
Warning! To avoid personal
injury or death, always unplug the appliance or disconnect the power before
attempting any repairs. Always turn off the gas at the source before repairing
any gas appliance. Always wear safety glasses when using tools. Keep loose
clothing and hair away from any moving parts. Safety is of major importance when
performing any service or repair on any electrical appliance.
By reading this page you state that you have read and agreed to RepairAve.com's
Disclaimer and Terms of Use. |
Replacing Water Inlet Hoses
Whirlpool® washing machines (direct drive)
|
|
|
|
| Instructions |
Illustrations |
 Disconnect
power before servicing. Replace all panels before operating. Failure to do
so can result in death or electrical shock. Disconnect
power before servicing. Replace all panels before operating. Failure to do
so can result in death or electrical shock. |
 |
|
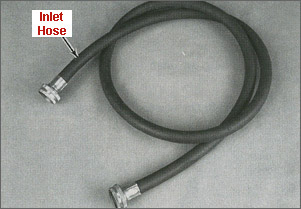
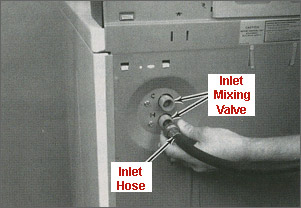
This hose is located in the back of the automatic washer. It is
connected at one end to the inlet mixing valve; the other end is connected
to the water faucet. |
 |
Removing the water
inlet hoses
1. Unplug washer or disconnect power.
2. Move the automatic washer away from the wall so you can work on
it.
Note: With a piece of tape, mark which faucet is the hot water
faucet. This procedure will make it easier when replacing the hoses.
3. Shut off the hot and cold water faucets.
Note: Care should be taken when removing hoses as they may have
water in them.
4. Using pliers, remove one of the hoses from the faucet.
5. Using a pail, drain the excess water from this hose.
6. Using pliers, remove the other hose from the other faucet.
7. Using a pail, drain the excess water from this hose.
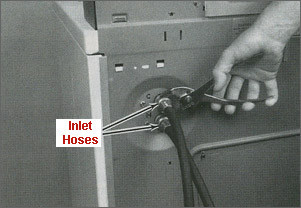
8. Using pliers, remove both hoses from the inlet mixing valve.
|
|
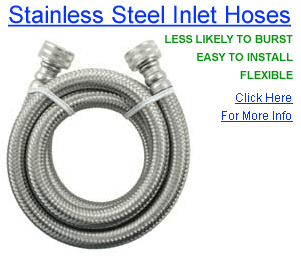
| Replace your old rubber
hoses with better,
stainless steel braided, hoses. |
 |
Installing the water
inlet hoses
1. Using pliers, hand turn one of the hoses (until tight) onto one
of the ports on the inlet mixing valve; then turn 1/4 turn with the pliers
to tighten.
2. Using pliers, hand turn the other hose (until tight) onto the
other port on the inlet mixing valve; then turn 1/4 turn with the pliers
to tighten.
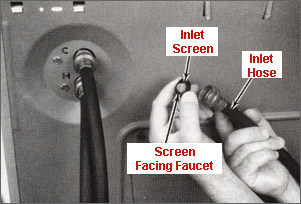
Note: Before attaching the hot and cold inlet hoses to the faucets,
you may want to reuse the inlet screens if your old hoses had them. If you
do, remove the inlet screens from the old hoses. Make sure they are
cleaned and install them with the screen facing the faucet.
3. Take the bottom hose which is the hot (H stamped on cabinet by
bottom part) and hand turn (until tight) onto the hot faucet you marked
with a piece of tape.
4. Using pliers, turn this hose 1/4 turn to tighten.
5. Take the top hose which is the cold (C stamped on the cabinet
by the top port) and hand turn (until tight) onto the cold faucet.
6. Using pliers, turn this hose 1/4 turn to tighten.
7. Remove the tape.
Note: Do not use the console as a hand support when moving the
appliance.
8. Move the automatic washer back to its proper place.
9. Plug in washer or reconnect power. |
 |
To find the right
inlet hose or any other part for your washer, enter the washer model number below
(where is the model number?)
|
|
|
- Troubleshooting guide
-
How washers work
- Removing washer cabinet (Taking your washer apart)
- Replacing timer knob
- Testing/Replacing water level switch
- Testing/Replacing water inlet valve
- Replacing water inlet hoses
- Repairing agitator problems
- Replacing drive block
- Checking/Replacing water pump
- Testing/Replacing motor switch
- Checking/Replacing motor drive coupling
- Testing/Replacing washer drive
motor
If your problem is not listed, try
this site.
|
|
|
|
|
|
|